I have been working on a guide dealing with astro imaging and processing. The linked page is the beginning to that guide. I am providing it, along with videos and updates for free currently, but if you wish to donate to support this type of content, please fell free.
Note, this guide is not definitive in any way but more for those who are new to astrophotography and looking to get an understanding of processing and even what needs to go into imaging itself.
I accidentally stumbled on how to make mosaics while trying to combine some data in Astro Pixel Processor. I had been taking images in Cygnus around the star Sadr and was trying to pull out some more detail when I realized that what I had done was make a mosaic! Since I had done it with two images, I decided to take some more panels and see what I could come up with:
Mosaic around SadrMosaic around Sadr – Starless
Since I hadn’t planned to do it from the start, my panel structure was off so I had to take one more panel then I would have needed to if I had planned it out ahead of time.
Propeller NebulaCrescent & Tulip NebulaeRegion near the double star FarawisTulip NebulaSadr & Crescent Nebula
Total integration time is 21 hours and 20 minutes. This makes it my image with the longest integration time. Integration for each panel:
Propeller Nebula – 48 x 300s Crescent & Tulip Nebulae – 48 x 300s Region near Farawis – 48 x 300s Tulip Nebula – 39 x 300s Sadr & Crescent Nebula – 73 x 300s (two sessions, one from June of last year and one from June of this year.
I used Stellarium to help figure out my framing and center point for capturing the panels. I captured each panel on a different night and stacked them in DeepSkyStacker. Mosaic was combined using Astro Pixel Processor and I saved the combination as an unstretched linear image. I processed the linear image using Photoshop. Processing consisted of color balance, stretching by levels and curves, noise removal using NoiseXterminator and various Astrophotography Tools Actions. Since I shot from Bortle 8, I had some weird gradients (my neighbor also had their backyard light on for two of the nights). Also, since I hadn’t planned to do a mosaic from the start, my framing was very inefficient. For my next mosaic, I will actually plan it better and probably use Teloscopius to figure out my framing. I tried several different processing techniques, first using a stretched image from Astro Pixel Processor, as well as using Siril to stretch the individual stacks before combining them in APP. In the end, linear combination and processing was the best!
It has been since November, 29, 2021 since the last time I was able to image, but finally on June 17, 2022 I was able to get back out there!
Sadr RegionSadr Region – Starless
During my last imaging session of last year, my laptop died and it has been nerve wracking trying to get set up again. Finally, we got a new laptop that I was confident would work and I set about getting everything hooked up and working. My first night back out I was about to get 2 hours and 15 minutes of imaging done on the Sadr Region, one of my favorite areas of the night sky to shoot! I am working on more images of this area in Cygnus and hope to post them all soon!
Ever since I took my first images of the Heart Nebula last November, I wanted to return to this target. I did so in December of last year right after my hospitalization with COVID-19 and produced my longest / largest project up to that point. At the time, I thought 6 hours was a very large amount of data! Since then, I did 11.5 hours on the Rosette Nebula, 14 hours on the California Nebula and now 20 hours on the Heart & Soul Nebulae together.
Here we have the 20 hours of data processed “normally” – Stacked in Deep Sky Stacker and then processed in Photoshop how I normally do my narrowband filtered data. Previously, I had only beer able to shoot these targets separately:
Putting both of these in the same field of view without having to attempt a mosaic was a huge selling point for me with the Radian Raptor 61 telescope. Another good scope for this is the RedCat 51 – they both have similar focal lengths and both have the capability to produce wonderful images. Being able to get as much time on these targets over only a few nights under a dimly lit / new moon was a huge improvement over my previous attempts on these targets as well.
Here we have the same data processed in a simulated SHO Palette. This is done by stacking the images in Astro Pixel Processor and separating the Ha and Oiii channels out while simulating a Sii channel. Once the separation is done, I then use APP to combine those channels as well as do a background calibration and a light pollution removal to help neutralize the background. Once that is done, I then finalize the processing in Photoshop like I normally would.
I did two separate processes after my initial processing because I felt like I had over saturated the image, making it look more like a painting then a photograph. The only difference between these two processes is color balancing at the end.
Lastly, we have the data processed in the HOO palette, which is a little more “natural” for the filter I use – the Optolong L-eNhanced filter. Here we take the Ha and Oiii channels and combine them, using the Oiii channel twice. Processing is the same once that is done using both APP and Photoshop.
Equipment & Statistics
Radian Raptor 61 Canon EOS Ra Optolong L-eNhanced Filter Sky Watcher EQ6-R Pro ZWO 30mm f4 MiniScope (guide) ZWO asi224mc (guide) . 184 x 360s (800 ISO) 20 x 300s (800 ISO) Dark, flat, bias and dark flats calibration frames Bortle 8 – Providence, RI
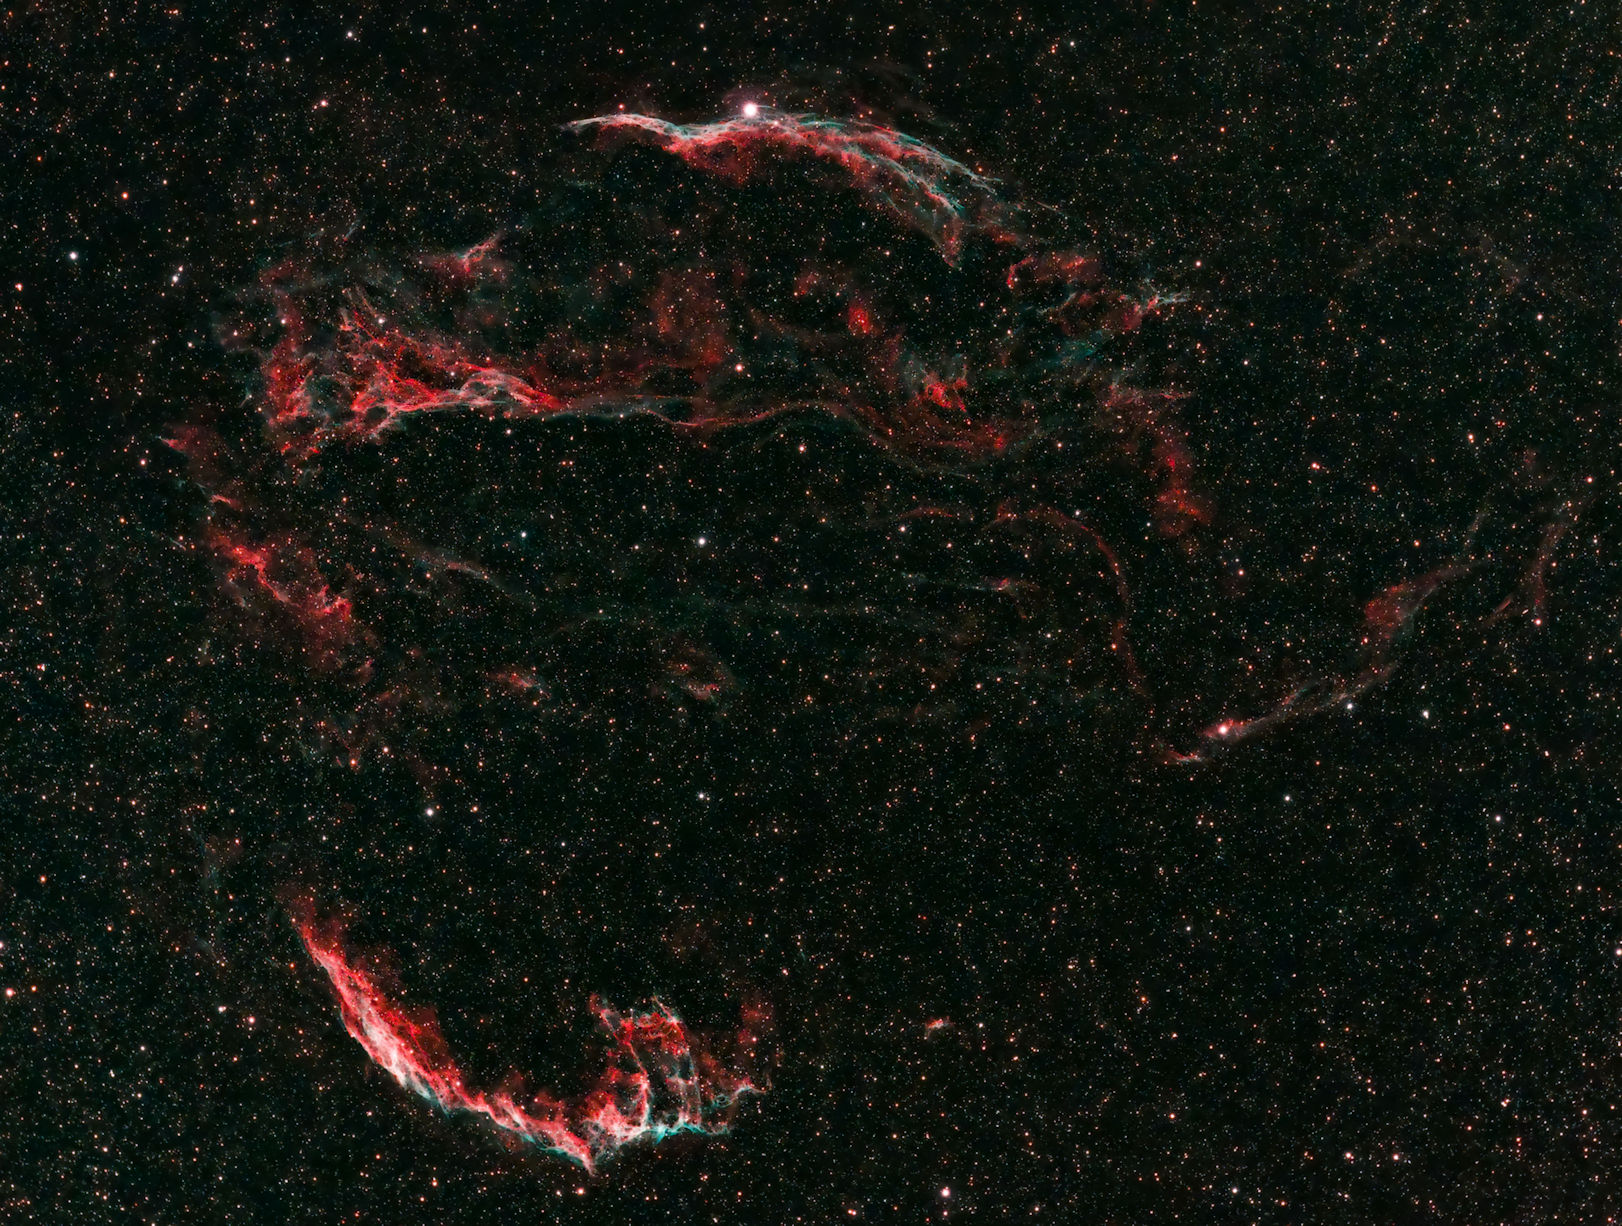
So, I and Bostronomy are at it again with another collaboration, this time with a much harder target and a much wider field of view. The Cygnus Loop, aka Sharpless 193, is a large supermova remnant in the constellation Cygnus. It consists of deep space objects NGC 6960, NGC 6979, NGC 6974, NGC 6992, NGC 6995, and IC 1340. Common names for these areas are the Eastern and Western Veil Nebulae. This target is challenging for many reasons, but the shear amount of stars in this location as well as the deep sky gradient make it a very challenging are to not only image but to process as well.
We took our images in July, July and August and I went through many attempts to stack and process these images to get it to where we both were happy with the final result. The struggle with this was real – from having heavy distortion with the initial stacking to having terrible color gradients, though a lot of trial and error we finally ended up with this. A total of around 17 hours of data produces a pretty sweet image!
Equipment & Stats –
122 x 300s 800 ISO Radian Raptor 61 Canon EOS Ra Optolong L-eNhanced filter
76 x 300s RedCat 51 ZWO asi2600mc Optolong L-eNhanced filter
Calibrated and stacked in Astro Pixel Processor, processed in Siril and Photoshop.
The weather in New England has been full of a lot of misses over the past month or so. Either too cloudy, too hot, or both. At the beginning of August, I decided to use the Radian Raptor 61mm to shoot the Elephant’s Trunk Nebula.
Processed as a HOO palette image using Astro Pixel Processor to separate the color channels, I really liked how this came out versus the “normal” processing and also the simulated SHO processing I did.
Radian Raptor 61 Canon EOS Ra Optolong L-Pro Filter ZWO 30mm f4 MiniScope (guide) ZWO asi224mc (guide) Pegasus Powerbox Advanced
19 x 360s Dark, flat, bias and dark flat frames for calibration ISO 800 – Taken in Providence, RI – Bortle 8
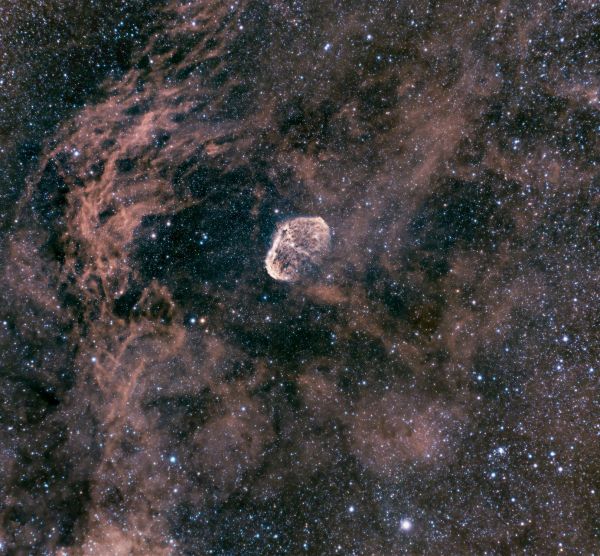
So, Bostronomy and I did a thing! After the recent APOD winner that featured the Crescent Nebula as a collaboration between three individuals, we decided to take our data on the same target and see if we could combine them. It began more as a test – we did not set out to do this when we first gathered data on the target – and only I had calibration files for my light frames, but I took our data, ran it through Astro Pixel Processor and behold, we were able to combine our data and process it!
Above, we have that data processed without simulating a luminance layer.
61 x 420s – Meade Series 6000 80mm Triplet APO Refractor Canon EOS Ra Ho-Tech Field Flattener Optolong L-eNhanced Filter
Full calibration frames – dark, flat, dark flat and bias frames. Data taken over 3 nights.
50 x 300s Explore Scientific ED102 ZWO ASI 2600mc-Pro Ho-Tech Field Flattener Optolong L-eNhanced filter
No calibration frames…
I stacked the images in Astro Pixel Processor, letting it know that the images were shot at different focal lengths and with different optics. I used different LNC and Multi-band blending settings to see what ended up the best (in my opinion) – This image was done with a LNC setting of 2nd degree and 6 iterations. From there, I let APP do a stretch, normalize the background and I did a light pollution removal. From there I took it in to Photoshop. In Photoshop, GradientXTerminator was used on its lowest settings with no background calibration. Starnet was not used. Astronomy Tools Actions used to remove noise (Deep Space Noise Removal) and to make stars smaller. No sharpening. Most processing was done in Camera RAW filter to set Vibrance & Saturation. The black, white, shadow and highlight were also used, as well as some minor contrast and exposure changes. Color mixer (in RAW Filter) was used to lightly boost red and blue saturation. For the starless, I did put it in starnet. For the inverted, I simply used Photoshop
The only difference here is that I took the red channel from the starless image in the first group and added that as a slight luminance layer. I set it at 5% opacity and adjusted the curves a little bit to try and bring out a little more nebulosity. The downside with doing it this was is that it can make it appear a little more pinkish then intended.
As mentioned before, this wasn’t planned at all, so we are hoping with doing an actual plan we will be able to produce something a lot better! Stay tuned!
I normally don’t do this – I typically leave my reprocesses to either Twitter or Instagram – but in this case, because I feel like this reprocessing of data added a lot more to it, I decided to make a post. Over the past several months my image processing has evolved to a place where I feel it is a lot better then it was back in January when I first took these images and put them together. I decided to go back and stack them all from scratch and start the process over. Below is the result of that effort.
This is a total of 11.5 hours over six individual sessions. I am looking forward to shooting this again when it is up and available for me, but probably in a slightly shorter focal length. This was shot at 380mm and I want to shoot it at 275mm with my Radian Raptor 61.
L-eNhanced: Jan. 7, 2021 – 40 x 240s (800 ISO) Jan. 10, 2021 – 40 x 240s (800 ISO) Jan. 20, 2021 – 19 x 240s (800 ISO) Jan. 21, 2021 – 37 x 240s (800 ISO) Jan. 22, 2021 – 23 x 240s (800 ISO)
NGC 6888, known as the Crescent Nebula (or Brain Nebula in some circles), is located around 5000 light years away in the constellation Cygnus. Close to the star Sadr, NGC 6888 is an emission nebula that was discovered by William Herschel in 1792.
I didn’t start out planning to shoot this target, but after putting my new Radian Raptor 61 through its first light paces, and capturing it in the corner of gathering light on Sadr (see this post) and the nebulosity around it, I decided to hop back to the Meade 80mm and try to shoot it at a longer focal length. Along with the Crescent Nebula, I also put a focus on Western Veil (seen in my previous post) and I am now putting a focus on Eastern Veil. Going from wide field to a slightly smaller field of view can be very fun, especially when you start to make out detail in some of the smaller objects.
I was able to get just over seven hours of total integration over 3 different nights. The first two nights the moon was not really present and it it wasn’t too bright when it was. The final night the moon was around 80% luminosity and up the entire imaging session. For all three sessions I used the L-eNhanced filter by Optolong filters. This filter is great for isolating the Ha and Oiii wavelengths of light as well as suppressing the light pollution that surrounds me – especially under Bortle 8 skies here in Rhode Island.
Equipment & Image Information
Meade Series 6000 80mm Triplet Refractor Canon EOS Ra Ho-Tech Field Flattener Optolong L-eNhanced Filter Sky Watcher EQ6-R Pro Mount ZWO 30mm f4 MiniScope (guide) ZWO asi120mm-mini (guide) Pegasus Power Box Advanced
I have been asked a few times recently about how I process my images. First, the two people I have gleamed the most information from are AstroBackyard and A.V. Astronomy. Both Trevor and Aaron provide wonderful tutorials and resources on just about everything you need when it comes to astrophotography, and I would encourage you to go and follow these two. That being said, my processing is not perfect, and in some cases probably comes off as lazy, but in the end, I am happy with my images and in my opinion, that is the most important thing there is. Obviously, improvement can always come and should be welcome, but being happy with your product is the first key to success.
I begin by stacking in DeepSkyStacker. Even though I use DSLR which is non-cooled, I still take dark and bias frames. I also take flats and dark flats. Because my camera is not cooled, I take dark frames right before I begin my imaging session. I could go through and do an average sensor temp with my dark frames that relate to the sub frames I take, but I do not. I try to take 10-20 dark frames, 50 bias and either 25 or 50 flats and dark flats.
Once stacked, I bring them to Photoshop where I do the majority, if not all, of my processing. My typical work flow is the following: – Small crop, convert to 16bit image from 32bit – Initial leveling – Threshold layer to find dark and light points – Levels – each channel separate to bring them in line – Curves – slight curve adjustment, then quick leveling (each channel individual) and repeat until my black point reaches around 36 in each channel – GradientXTreme – Usually on the two lowest settings, never higher then the middle setting. I look at it both with leveling background checked and without – Astronomy Tools Actions – I usually run the two Violet Halos options as well as Smaller Stars here – Camera RAW Filter – Here is do a lot, especially on my first go through – First, I look at the Color Mixer and adjust individual saturation and luminance. Usually it is red and orange channels, and sometimes the aqua and blue channels. I then go to the Basic tab and adjust vibrance, saturation, black, white, highlights and shadow levels. I also will typically adjust the exposure a little as well. The key here, for me, is to make sure I am not clipping anything nor making anything too bright while starting to bring out the color of what I am shooting. – Topaz DeNoise – the latest update brings us the Severe Noise option which feels a little better then the Low Light one. I usually put it on Auto then bring the sharpness down by half. – Astronomy Tools Actions – I try the Space Noise and Deep Space Noise options here and depending on how it effects the detail of the nebula, I may or may not go with any of them. Always good to check. I’d rather have some noise and keep structure in my nebula then loose it because the software assumed it was noise. – Astronomy Tools Actions – Enhance DSO is done here. Sometimes I like it, sometimes I don’t. If I don’t like it I just continue on to RAW filter and if I do… well, I also continue on to RAW filter! – Camera RAW Filter – minor adjustments in the basic tab. I may repeat this a couple of times – Astronomy Tools Actions – Contrast Enhancement – I run this then usually set the layers opacity to 50% or below.
At this point I flatten the image and save it as a 16bit tiff to run it through Starnet++ – an excellent program that removes stars but leaves the nebula.
While doing this, I attempt a mask using the Color Selection -> Highlights to bring out the nebulosity a bit more. A.V. Astronomy has a good video on it. Sometimes this works, sometimes it doesn’t. By this point my starless image should be done and I bring that into Photoshop, isolate the red channel, copy and paste it as a new layer in the image I am working on. From there, I set the opacity of that layer to 10% and adjust the highlights to see if I can bring out the dust a little more. Keep in mind, this will make your image a little pink versus red. This does two things – first, you can set your black point a little lower and it will offset if you clip a little bit. You can also adjust your saturation a bit more to make it more red. This layer acts as a luminance layer – though a true Ha luminance layer will work much better. What is even better, you can use both methods I mentioned in the same image! Just be careful not to over do it!
At this point I save a main image jpg, I save an inverted version and I make one more starless version to match my current process. I always make sure to keep a working Tiff file that has all my layers available in case I want to go back and try something different.
The Cygnus Loop is a large supernova remnant within the constellation Cygnus which is now visible in the night sky in the Northern Hemisphere. The entire structure is around 3 degrees in size and sits around 2,400 light years away. It has an age of around 21,000 years. This target, for me, was one of the more frustrating targets. Its unique coloring, its “whispiness” and the sheer amount of stars make it a challenging target to both shoot and more importantly, process cleanly. In total, for the Western Veil images, I got around 5 hours of data total and I feel like to get it completely “clean” I would need around 15 more total hours for a total of 20 hours on target. I am hoping to get this amount in a more wide field, which I have already begun and is shown in the images at the end of this post.
These images where processed as an HOO image. This means three channels, one in Ha, and two in Oiii. This was down with a one shot color camera utilizing a dual narrowband filter – the Optolong L-eNhanced. The channels were separated in Astro Pixel Processor then recombined and then processed in Photoshop. I really like how the stars here have decent color, which is typically difficult to achieve when processing normally when using a narrowband filter.
These images have a more “traditional” processing method – stacking in Deep Sky Stacker then processing in Photoshop.
As you can see in both sets, there are a large amount of stars, even with star reduction techniques being used. The inverted images really show the star field and the deep contrast of the nebulosity.
Image & Equipment Information:
Meade Series 6000 80mm Triplet APO Refractor Canon EOS Ra Optolong L-eNhanced Filter Ho-Tech Field Flattener ZWO 30mm f4 MiniScope (guide) ZWO asi120mm (guide) Pegasus Powerbox Advanced
15 x 360s (6/16/2021) 30 x 420s (6/17/2021) Dark, flat, bias and dark flat frames for calibration ISO 800 – Taken in Providence, RI – Bortle 8
These images show the entirety of the Cygnus Loop. The annotated version is provided by astrobin.com. These were taken with a similar setup as the Western Veil images, but with the Radian Raptor 61 instead of the Meade 80mm. Here you can see the Western Veil at the top of the image with the Eastern Veil nebula at the bottom. Though I was planning on putting a lot of focus on the North American Nebula, I think I am going to put some time in on Eastern Veil with the Meade and the Loop as a whole with the Raptor. This image needs a lot more data as I only have just over an hour and a half so far.
Image & Equipment Information:
Radian Raptor 61 Canon EOS Ra Optolong L-eNhanced Filter ZWO 30mm f4 MiniScope (guide) ZWO asi224mc (guide) Pegasus Powerbox Advanced
20 x 300s (6/13/2021) Dark, flat, bias and dark flat frames for calibration ISO 800 – Taken in Providence, RI – Bortle 8